A Guest Post by Rob Dweck.
When planning this series of articles on plug-ins and actions, one of my considerations was what sequence to present them. Do I cover all of the plug-ins from one developer and then the next, or do I jump around from one to another. I settled on the latter for several reasons, the primary one being that many plug-ins from different developers perform similar functions and it might make more sense to do those one after another.
 With that in mind, the next posts will deal with onOne Software’s Photo Tools. There are many similarities between Photo Tools and Color Efex Pro and in this post I want to highlight those similarities as well as the many differences between the two plug-ins.
Nik Color Efex Pro comes in three editions: Standard, Select and Complete with 15, 35 and 52 filters respectively. I’ll be referring only to the Complete Edition here. OnOne offers a free version of Photo Tools with 26 effects as well as the paid version with over 300 effects. This comparison refers to the full version. If you own one of these plug-ins and are not sure if it’s worth getting the other, or if you own neither of them and can only afford to buy one, this post may help you decide which is the best for you.
Nik Color Efex Pro and onOne Photo Tools do many of the same things, and they do them very differently. Both plug-ins are essentially collections of effects and filters that are applied to photos in various ways. (Note: Color Efex Pro uses the term “filters” and Photo Tools uses the term “effects” to describe the same thing in their respective programs. I will be using the two terms interchangeably in a feeble attempt at impartiality.)
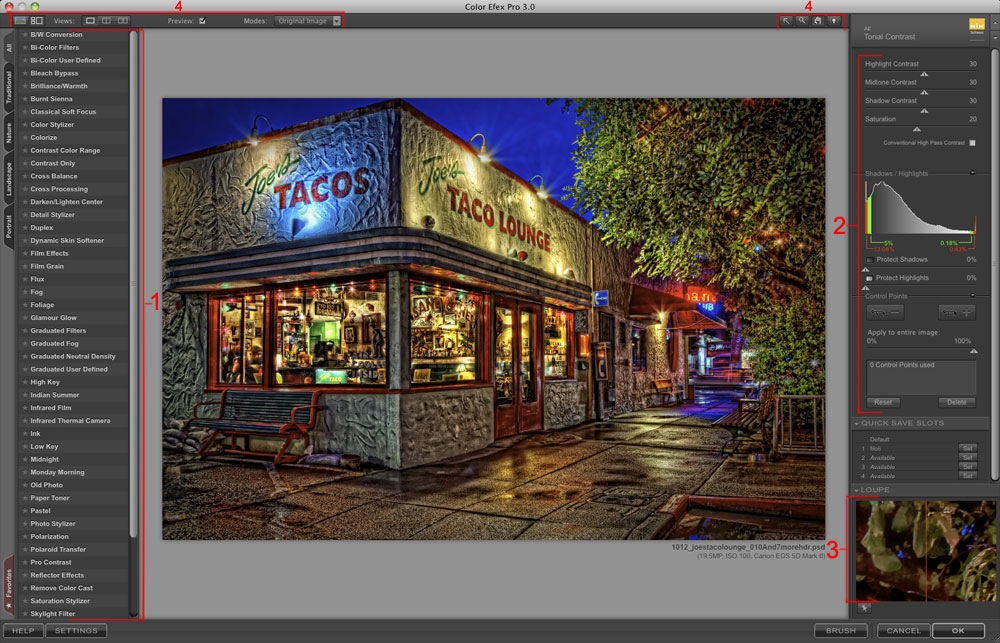
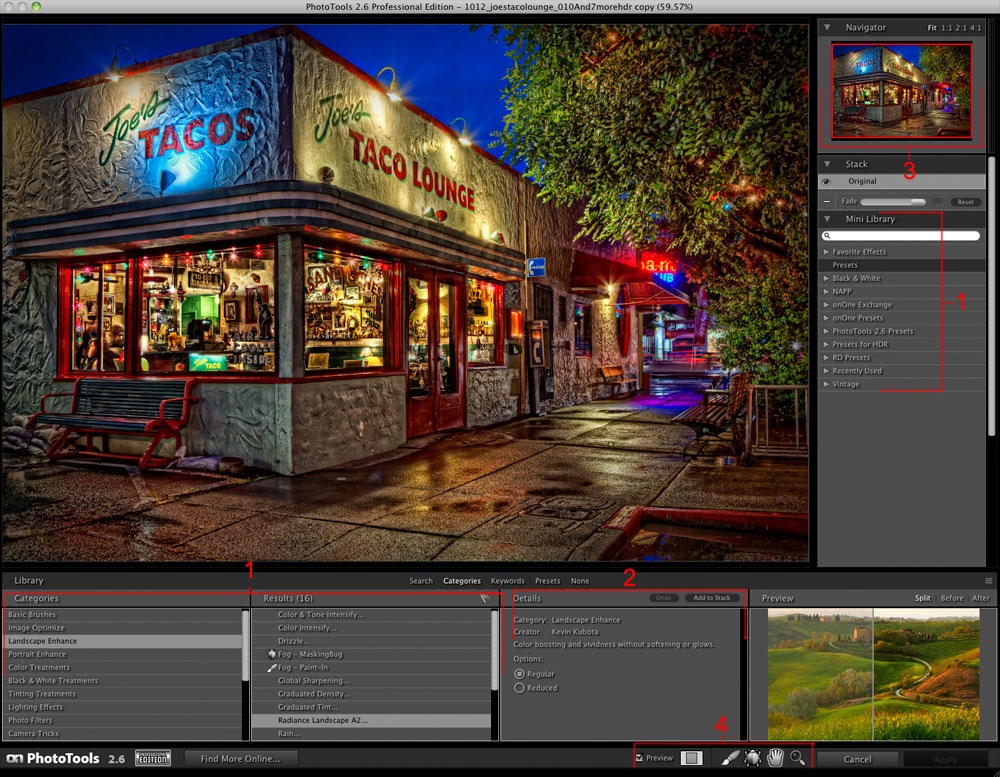
In the 2 screenshots above, you can see the similarities between the two plug-ins. I labeled the four main features that are common to both:
- Both plug-ins have an extensive library of effects that are organized by category. They both let you flag those effects that you use frequently as favorites so you don’t have to search for them every time you want to use them. In addition to the library of effects, Photo Tools comes with several presets (seen in the right column). These presets are combinations, or “stacks” of effects from the library that can be applied with one click. I’ll discuss this more in depth a little later.
- Both plug-ins provide controls that allow you to fine tune the various filters. Each Color Efex Pro filter has several types of controls that allow for numerous variations. Many Photo Tools effects have no controls at all, and of the ones that do have them, they are mostly simple radio buttons that make one adjustment in most cases.
- The Loupe in Color Efex Pro and Navigator in Photo Tools perform the same function, slightly differently. Both can give you an overview of the entire image when you’re zoomed into one specific area in the main preview, or a detailed view if you’re looking at the entire image in the main preview.
- The two plug-ins provide tools for zooming, displaying the before and after images in various ways (split screen, full screen, etc.), moving around the image, as well as a preview check box to compare the processed and unprocessed image. There are a some tools that are not present in both plug-ins, such as the select and background color tools in Color Efex Pro and the brush and masking bug tools in Photo Tools.
Effects vs. Filters
While there are many similarities between the filters in Color Efex Pro and the effects in Photo Tools, there are even more differences. One of the most noticeable differences is in the number of filters and effects. As mentioned earlier, Color Efex Pro has 52 filters and Photo Tools has over 300.
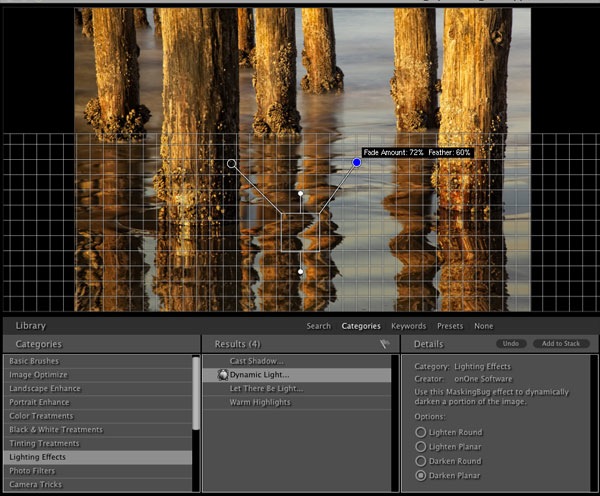
But numbers don’t tell the full story. Many of the effects in Photo Tools offer a selection of radio buttons that allow for some variation of the effect as well as a handful of effects that use the masking bug (seen below), a unique tool that is overlaid on the image preview and is a more visual alternative to using sliders to adjust the effects. The rest of the effects have no variables. Several of the effects only work on 8 bit images, and when you’re working on 16 bit images it can be frustrating to get the warning that the selected effect will only work on 8 bit images.
Another difference is speed. Both plug-ins are pretty zippy when working on small files, but Photo Tools can get sluggish with larger files. Click on a filter in Color Efex Pro and the preview window updates near instantaneously most of the time. Adding an effect in Photo Tools brings up a little progress box that shows how much of the effect is loaded. The several seconds of loading time might not seem like a big deal, but when you’re auditioning one effect after another, it can get tedious, even when the option to use a smaller version of the image for previews is enabled.
Despite the speed issues, one of the biggest advantages of Photo Tools is the ability to stack several effects (see the right column in the screenshot below). Click an effect in the library once and a brief description of the effect appears as well as any options available for that effect. Double click an effect and it is added to the stack where you can use the Fade slider to change the opacity of each effect. I haven’t found any limit to the number of effects that can be stacked, but as the stack grows, so does the processing time once the Apply button is clicked. In Color Efex Pro there is no stacking, so you select a filter and apply it. Want another filter? Re-launch Color Efex Pro, select another filter and apply it. Repeat for each additional filter.

The two plug-ins have different options for selectively applying filters and effects as well. In Color Efex Pro you can click the OK button to apply the filter to the entire image or click the Brush button to paint in the filter in any part of the image using a layer mask. A third option is adding one or more control points (the little dots in the screenshot below) to change the opacity of the filter in different areas of the image. Photo Tools has a brush tool that will be familiar to anyone who uses layer masks in Photoshop. There are even options to control the brush size and opacity with stylus pressure on a Wacom tablet.

Post Post-Processing
When editing photos, I will often do additional work after Color Efex Pro and Photo Tools are applied to an image. Occasionally, I find that I want to go back and make some changes to the effect that was applied with the plug-ins. Depending on how the plug-in was used, this can be done in some instances.

Only Color Efex Pro allows you to go back and pick up all of your settings as you left them. To do that, you have to first convert the layer on which you apply the filter to a smart object in Photoshop
before
launching the plug-in. No smart object, no going back. After you apply a filter to a smart object, you can go back anytime and the settings will be exactly as they were when you clicked the Apply button.
There is another way to go back and edit your previous settings, but it involves using your original unprocessed layer and applying the filter again. Both plug-ins allow you to create presets, but they function differently. Color Efex Pro has four “Quick Save Slots” for each filter. These are great timesavers that let you store frequently used settings for future access. You can use these slots to save your settings for an image you’re editing, re-apply the filter on the original layer and apply your preset from the Quick Save Slot. Unfortunately, control points are not saved in these slots and if they were used, have to be redone manually.
Photo Tools allows you to save stacks of effects as presets, so you can follow a similar procedure: Create your stack, save it as a preset, and apply the effects. If you need to make changes, select your original layer, open Photo Tools and select your preset. The fade settings for each effect are saved, but any painting done with the brush tool will be gone.
The important point, regardless of which plug-in you use, is to work on a copy of the background layer and always have the plug-in save to a new layer. If you work on your original layer, it’s possible you may not be able to return it to the original state.
The Best Tool For The Job
Both Color Efex Pro and Photo Tools have their strengths and weaknesses. Both can open up lots of creative possibilities and make editing your photos easier and, dare I say it, more fun. They are both an indispensible part of my toolbox and very often I use both plug-ins on the same photo.
Which one is best for you? Maybe both, maybe neither. The easy way to find out if these plug-ins can enhance your workflow is to download a trial from the developer’s websites. Both Color Efex Pro and Photo Tools are intuitive enough to get good results quickly, and with more time and exploration, the power of these plug-ins can help you transform your photographs into beautiful works of art.
Check out both tools at Color Efex Pro and onOne Photo Tools.
Rob Dweck is a San Francisco Bay Area based photographer who specializes in landscape and nature photography. His work can be viewed at robdweck.com.


Some Older Comments